Install the app
How to install the app on iOS

Follow along with the video below to see how to install our site as a web app on your home screen.

Note: This feature may not be available in some browsers.

Welcome to the forum. Although you can post in any forum, the USA forum is here in case of local regs or laws

Aug 4, 2025
6
0
1
United Kingdom
Member Type
DIY or Homeowner
Hi all,

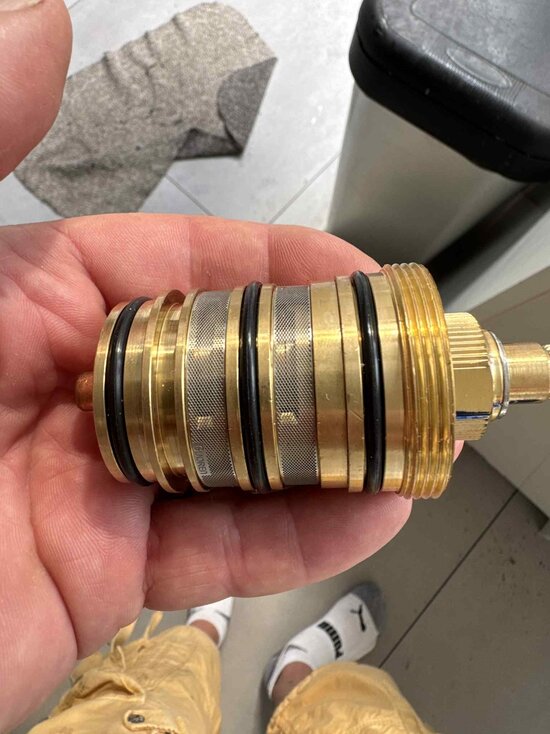
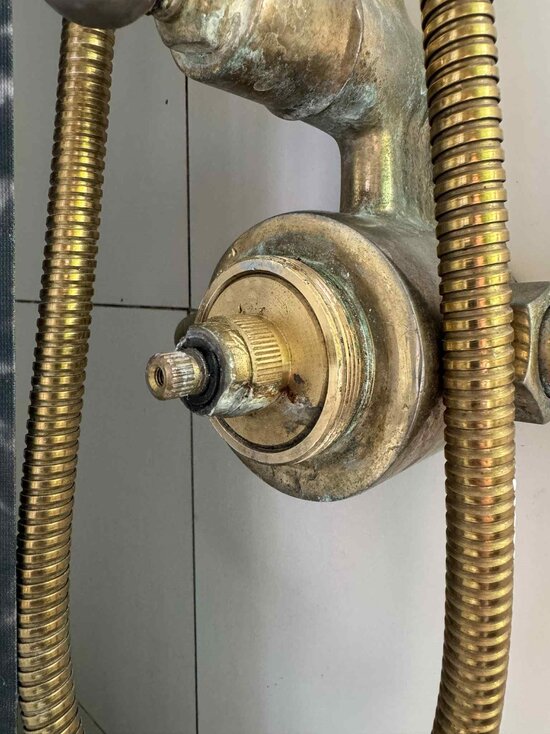
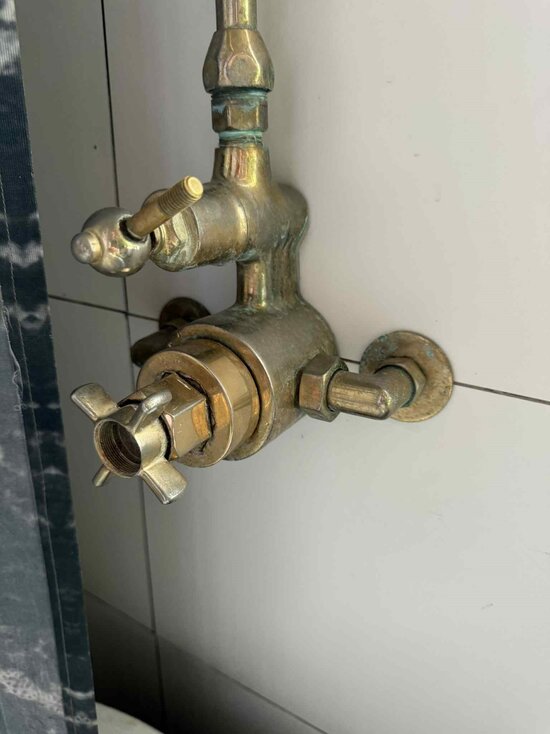
I hope someone can help, we have an exposed traditional style shower valve made or supplied by Ultra and it has been leaking and caused a mess to the ceiling below. I have a replacement from the shower doctor but the existing cartridge seems to be stuck in the shower valve main unit,

The cartridge has 2 flat sides for a spanner and is begining to become deformed from attemoted remova using a 17mm spaner which was a good snug fit.

I'd apreciate any advice on how to remove without causing any damage to the cartidge or even the 15mm inlets at 150 centres,

Thanks in advance.

 

Attachments

  • Valve 2.jpg
    Valve 2.jpg
    115.4 KB · Views: 16
  • Cartridge.jpeg
    Cartridge.jpeg
    203.3 KB · Views: 14
  • Valve 1.jpeg
    Valve 1.jpeg
    276.6 KB · Views: 12
Protect vulnerable finishes in the vicinity and try some 'Plus Gas' dismantling lubricant. Available from Screwfix, for example. Do not use WD40 first, it doesn't work as well and the residual silicone may prevent the Plus Gas doing its job.

If that doesn't work, take it off the wall and try some heat. N.B., Plus Gas is very flammable so take great care if you've been using it.

As you probably know, brass is so soft you may well distort the casting in the process of applying enough torque to break the corrosion. If you have access to an engineering workshop then a milling machine can probably be used to bore the old cartridge out without damaging the thread but it'll be cheaper to replace the unit unless your time is free and you get "mates' rates".
 
  • Like
Reactions: Rake722
Pouring hot water over the main body of the valve may cause enough expansion to allow the cartridge to break free.
 
  • Like
Reactions: Rake722
Hi all,

I hope someone can help, we have an exposed traditional style shower valve made or supplied by Ultra and it has been leaking and caused a mess to the ceiling below. I have a replacement from the shower doctor but the existing cartridge seems to be stuck in the shower valve main unit,

The cartridge has 2 flat sides for a spanner and is begining to become deformed from attemoted remova using a 17mm spaner which was a good snug fit.

I'd apreciate any advice on how to remove without causing any damage to the cartidge or even the 15mm inlets at 150 centres,

Thanks in advance.
I wish I'd got a pound for every jammed shower cartridge I've had replace. This is how I do it, others have their own way.

The reason it's stuck is due to a build up of calcium and other minerals in the water 'gluing' the threads
together. My way of sorting it is to heat up the outer threads of the shower body with a blow torch (all the way round), until you can move it with a spanner. Might take a good five minutes of heat from a blow torch with a lowish flame. You can also use the same method to remove stubborn immersion heaters, works every time.

Hope this helps.
 
  • Like
Reactions: Rake722
I wish I'd got a pound for every jammed shower cartridge I've had replace. This is how I do it, others have their own way.

The reason it's stuck is due to a build up of calcium and other minerals in the water 'gluing' the threads
together. My way of sorting it is to heat up the outer threads of the shower body with a blow torch (all the way round), until you can move it with a spanner. Might take a good five minutes of heat from a blow torch with a lowish flame. You can also use the same method to remove stubborn immersion heaters, works every time.

Hope this helps.
Thanks for the replies so far,

I am building up to addressing it, pretty scary as if I damage the main shower unit we dont have a shower and potentially no water in the house until a replacement is found. This same unit is no longer available so would have to be a complete replacement.

So when you say outer threads you mean the main body of the shower valve I take it ?

Would this not discolour the brass shower valve ?

Thanks
 
if I damage the main shower unit we dont have a shower and potentially no water in the house until a replacement is found.
While you're sorting the thing out, fit an isolator valve in each feed to the shower. Depending on the design of the mixer and the type of supply you might also want non-return valves (NRV).
 
Thanks for the replies so far,

I am building up to addressing it, pretty scary as if I damage the main shower unit we dont have a shower and potentially no water in the house until a replacement is found. This same unit is no longer available so would have to be a complete replacement.

So when you say outer threads you mean the main body of the shower valve I take it ?

Would this not discolour the brass shower valve ?

Thanks
Ok, the thing with warming up components is to give it enough heat so the threads are 'released'. It's a learnt thing.

So, I'm going to assume you've not done this before? Right, get the blowtorch fired up to a low/medium flame then work it around the main body thread of the shower valve for a good 5 minutes while holding your spanner with a small force to undo the cartridge. After 5 minutes give it a good turn and see if the cartridge is loose. If not repeat the heat for 30 seconds to a minute at a time until it's loose.

It shouldn't discolour the brass valve because you won't be warming it up that much and it's only on the main threads which will be covered by a cap.

Hope this helps.
 
  • Like
Reactions: Rake722
While you're sorting the thing out, fit an isolator valve in each feed to the shower. Depending on the design of the mixer and the type of supply you might also want non-return valves (NRV).
There are 2 isolators under the floor, I drilled holes for access, just worried that they might break or not work after being there for 16 years.
 
There are 2 isolators under the floor, I drilled holes for access, just worried that they might break or not work after being there for 16 years.
Seems like a good time to test / replace them.
 
Ok, the thing with warming up components is to give it enough heat so the threads are 'released'. It's a learnt thing.

So, I'm going to assume you've not done this before? Right, get the blowtorch fired up to a low/medium flame then work it around the main body thread of the shower valve for a good 5 minutes while holding your spanner with a small force to undo the cartridge. After 5 minutes give it a good turn and see if the cartridge is loose. If not repeat the heat for 30 seconds to a minute at a time until it's loose.

It shouldn't discolour the brass valve because you won't be warming it up that much and it's only on the main threads which will be covered by a cap.

Hope this helps.
Thanks for this, I have worked on stuck stuff before but mainly automotive not shower hardware. I have used heat and shock before today but on alluminium / steel / iron - not brass. I guess its the same principal but just a more gentle approach. I am just so aware of the potential for this to go wrong so still havent tried it yet,

Lets say worst case happes and the valve gets damaged, I would have to hope that a different brand at 150 centres fr inlet would fit but I dont know if it would.
 
i assume you have checked the new cartridge for whether it is reverse thread? been caught out a few times with that on shower valves. Look at the new cartridge and see which way the threads go - although some makes changed during production, early ones reverse, newer ones standard thread. Who'd be a plumber?
 
  • Like
Reactions: Rake722
i assume you have checked the new cartridge for whether it is reverse thread? been caught out a few times with that on shower valves. Look at the new cartridge and see which way the threads go - although some makes changed during production, early ones reverse, newer ones standard thread. Who'd be a plumber?
Thanks - good shout but this seems to be normal thread. Thum nail in bottom thread, rotate clockwise thumb nail ends up at top of thread. Righty Tighty.
 

Official Sponsors of Plumbers Talk

We recommend City Plumbing Supplies, BES, and Plumbing Superstore for all plumbing supplies.